In a modern day web application, we want to use APIs for creating responsive web applications. This is done by using async calls to the APIs and therefore reduce the number of postbacks to the server, making a better user experience and reducing the load on the web server.
An example of using this principle is SPAs (Single Page Application). The principle behind SPAs is that all rendering is done on the client-side, so instead of the server being responsible for rendering, the clients browser is now responsible for that task.
So to get all the benefits that an API gives us, we have to know how to create one and how to consume it. It is very easy nowadays and if you’re familiar with creating controllers in ASP.NET MVC 5 then learning to create an API won’t take long.
Setting up the project
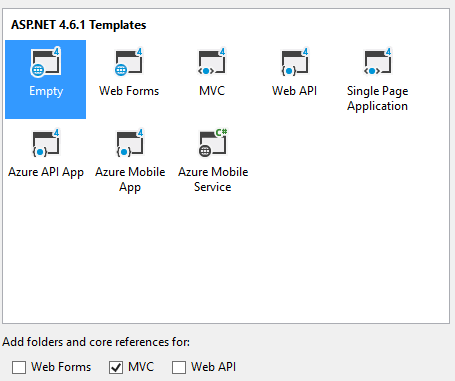
I’ve created an empty ASP.NET web application with a reference to MVC, as shown below.

To be able to create HTTP/REST based APIs we will have to install “Microsoft.AspNet.WebApi” from NuGet package manager.

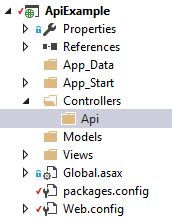
When the package has been installed the next step is to create a folder to hold the API controller implementations, you can either place them in a separate folder and name it something like “ApiControllers” or simply, create a folder named “Api” inside of the “Controllers” folder.
Inside of the “Api” folder, you create a new class and name it “BooksController”.

Creating the API
The first thing to do is to inherit from “ApiController” in “System.Web.Http”, that class gives all the implementations we need to create REST based APIs.
If we look into the code you can see that it contains a public method named “GetBooks” which has a return value of “IHttpActionResult” and the method itself returns “Ok()”. It uses the HttpGet attribute, to specify that it should be consumed on HTTP GET requests.
When we are dealing with REST APIs we are using the HTTP protocol.The IHttpActionResult return type is used to respond to the consumer with meaningful HTTP messages or status codes.
The “Ok” response that is implemented returns a code 200 meaning the request was successful. In your application, you want to use response codes to follow the standard guideline of APIs, this means that if the user sends bad data to your API then you should respond with a code 400 bad request.
Here is a list of the status codes that I use the most and the method to return for the specified status code.
- 200 Ok
- return Ok();
- 201 Created
- return Created();
- 400 Bad Request
- return BadRequest();
- 401 Unauthorized
- return Unauthorized();
- 404 Not Found
- return NotFound();
- 500 Internal Server Error
- return InternalServerError();
The last thing we need to finish in the “GetBooks” API action is to return data. I’ve created some static sample data that we can work with.
The book class
using System;

namespace ApiExample.Models
{
    public class Book
    {
        public int Id { get; set; }
        public string Title { get; set; }
        public string Author { get; set; }
        public DateTime ReleaseDate { get; set; }
    }
}
The updated controller
using ApiExample.Models;
using System;
using System.Collections.Generic;
using System.Web.Http;

namespace ApiExample.Controllers.Api
{
    public class BooksController : ApiController
    {
        private readonly List<Book> _books;

        public BooksController()
        {
            _books = new List<Book>()
            {
                new Book {Id = 1, Author = "Lauren Kate", ReleaseDate = DateTime.Now, Title = "Torment"},
                new Book {Id = 2, Author = "Daniel O'Malley", ReleaseDate = DateTime.Now, Title = "Stiletto"},
                new Book {Id = 3, Author = "Sylvain Neuvel", ReleaseDate = DateTime.Now, Title = "Sleeping Giants"}
            };
        }

        [HttpGet]
        public IHttpActionResult GetBooks()
        {
            return Ok(_books);
        }
    }
}
We pass the “_books” list into the “Ok();” return, that way the object will be sent back on request.
The way data gets into the controller is bad practice and is only implemented that way to make the solution simple, in a real world you would receive the data from a class that deals with the persistence of the application.
Routing
To make use of the API we have created, we will have to configure a route to the API.
The reason is that currently, the MVC framework is looking for {Controller}/{Action}/{Id?} this means that to access a “Product” controller, with a “GetDetails” action that receives an Id the URL would look like this “www.mysite/product/getdetails/1”.
So to find the route, MVC framework looks in the Controllers folder looks for classes that inherit “Controller” find the name of the controller and calls the action method that the user asked for in the URL. The problem is currently that our API controllers don’t inherit from “Controller”, but from “ApiController”, so we will have to tell the framework how to find our APIs.
So inside of the App_Start folder create a new class and name it “WebApiConfig”.
In that file, we will setup the configuration.
using System.Web.Http;

namespace ApiExample
{
    public class WebApiConfig
    {
        public static void Register(HttpConfiguration config)
        {
            config.Routes.MapHttpRoute(
                name: "DefaultApi",
                routeTemplate: "api/{controller}/{action}/{id}",
                defaults: new
                {
                    id = RouteParameter.Optional
                }
            );
        }
    }
}
So the file contains a class named “Register” taking in a HttpConfiguration, this HttpConfiguration is the object that we use to map our routes.
So we start creating a route on the HttpConfiguration, we give it a name, in this case, we have just given it a default name, because we will only have a single API configuration, but you can name it whatever you want.
Next, is the “routeTemplate”, we specify that we want “api” to be used in the URL to the reach the controller and action method. So the URL to our “GetBookings” would be “www.mysite/api/books/getbooks/”
The last thing is to call the “Register” method from the “Application_Start” in “Global.asax”.
using System.Web.Http;
using System.Web.Mvc;
using System.Web.Routing;

namespace ApiExample
{
    public class MvcApplication : System.Web.HttpApplication
    {
        protected void Application_Start()
        {
            AreaRegistration.RegisterAllAreas();
            GlobalConfiguration.Configure(WebApiConfig.Register);
            RouteConfig.RegisterRoutes(RouteTable.Routes);
        }
    }
}
The only line added is:
GlobalConfiguration.Configure(WebApiConfig.Register);
Using the API
So to use the API you can either implementing some code that can consume the API or use a tool to call the API to check that it works. In this example, we will just use a third party tool named Postman and call the API. You can download it here https://www.getpostman.com/.
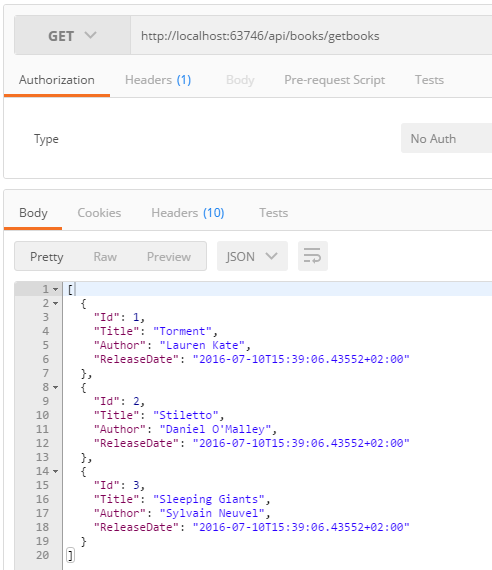
So I start the application up, open postman and call the API.

So you can see that I call the “api/books/getbooks” on a GET request and receive three items, with the data we specified.