In this blog post, I will talk about Entity Framework Code First. I expect that you have a basic understanding of Entity Framework, what it is, and how it works. I will talk about best practice and why we should use Entity Framework Code First. First, I will show an example of a code first implementation.
Example
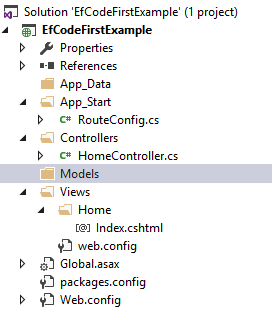
I’ve created a clean ASP.NET MVC (4.61) solution with Entity Framework installed (6.1.3).
Project structure looking like the picture below.
Database Context
The first step is to create a context.
We don’t use the database-first approach, so we will have to create our own. To do that we create a class in the “Models” folder and name it “ApplicationDbContext”, the name of the class doesn’t matter, but it is considered a good practice to put “dbcontext” as part of the name.
Next step is to add the following using statement and inherit from “DbContext”
using System.Data.Entity;

namespace EfCodeFirstExample.Models
{
    public class ApplicationDbContext : DbContext
    {
    }
}
By inheriting from DbContext, we get all the methods that we would normally get from the database-first approach. This will be the class that we place the models that we want to store in the database. Now create a constructor for the ApplicationDbContext and pass in a connection string to the base class constructor.
namespace EfCodeFirstExample.Models
{
    public class ApplicationDbContext : DbContext
    {
        public ApplicationDbContext() : base ("DefaultConnectionString")
        {
        }
    }
}
I named it “DefaultConnectionString” if you ever want to use another database, just pass in another connection strings name in the base class constructor.
Now we need to add a connection string to the web.config file. So go to your web.config file in the root of your project and add the following code just under the “” tag
<connectionStrings>
    <add name="DefaultConnectionString" connectionString="Data Source=(LocalDb)\MSSQLLocalDB;AttachDbFilename=|DataDirectory|\EfCodeFirstExample.mdf;Initial Catalog=EfCodeFirstExample;Integrated Security=True" providerName="System.Data.SqlClient" />
</connectionStrings>
Models
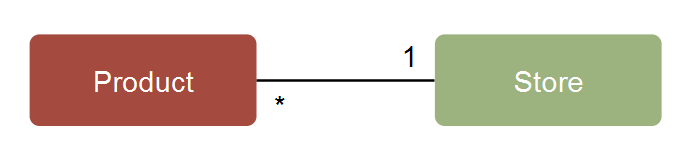
Next step is to create some models that we can use. In this example, I’ve created a “Product” class and a “Store” class. The two classes have a one to many relationship.
public class Product
{
        public int Id { get; set; }
        public string Name { get; set; }
        public float Price { get; set; }
        public int Stock { get; set; }
}

public class Store
{
        public int Id { get; set; }
        public string Address { get; set; }
        public ICollection<Product> Products { get; set; }
}
When the models are created we need to go back to the “ApplicationDbContext” class and add the following lines.
public class ApplicationDbContext : DbContext
{
    public DbSet<Product> Products { get; set; }
    public DbSet<Store> Stores { get; set; }

    public ApplicationDbContext() : base ("DefaultConnectionString")
    {

    }
}
The DbSet is a way to tell Entity Framework what collection of entities that you want to query from and add to the database. So every time you create a new entity/model add it to the DB set.
When the entities are added to the DbSet we can start running a code-first migration, but before we can start a migration, we have to enable it.
Code-first migration
Open your NuGet package manager console and type: enable-migrations
When that is done, you will have a new folder in your project named “Migrations”. If you open the file, then inside of the folder, you can see that it contains two overridden methods, one of them is the configuration, in that method you can configure how your migrations should be handled. The other method is named “Seed”. In some of the Microsoft guides, they tell you to seed the database in that method, but I think it is better to do it manually in a migration because you will have more control over each migration that way.
internal sealed class Configuration : DbMigrationsConfiguration<EfCodeFirstExample.Models.ApplicationDbContext>
{
    public Configuration()
    {
        AutomaticMigrationsEnabled = false;
    }

    protected override void Seed(EfCodeFirstExample.Models.ApplicationDbContext context)
    {
        // Removed the code from the Seed method.
    }
}
To summarize, we have:
- Added Entity Framework to the solution
- Created a database context class
- Added a connection string to the web.config
- Created the needed models
- Added the models to the DbSet
- Enabled migrations
Next step is now to run the migration. To run the migration, you open up NuGet package manager console and type: “add-migration” and give it a name, it will ask for a name after you type “add-migration” and press enter. Another way is to type “add-migration name” and insert the name of the migration on the name position.
It is important to give the migration a good name, so you easier can find it if you ever need to make a rollback to the migration. I named the migration the following: “AddStoreAndProduct”.
Now Entity Framework will do it’s thing and it will create a migration file.
public partial class AddStoreAndProduct : DbMigration
{
    public override void Up()
    {
        CreateTable(
            "dbo.Products",
            c => new
                {
                    Id = c.Int(nullable: false, identity: true),
                    Name = c.String(),
                    Price = c.Single(nullable: false),
                    Stock = c.Int(nullable: false),
                    Store_Id = c.Int(),
                })
            .PrimaryKey(t => t.Id)
            .ForeignKey("dbo.Stores", t => t.Store_Id)
            .Index(t => t.Store_Id);

        CreateTable(
            "dbo.Stores",
            c => new
                {
                    Id = c.Int(nullable: false, identity: true),
                    Address = c.String(),
                })
            .PrimaryKey(t => t.Id);

    }

    public override void Down()
    {
        DropForeignKey("dbo.Products", "Store_Id", "dbo.Stores");
        DropIndex("dbo.Products", new[] { "Store_Id" });
        DropTable("dbo.Stores");
        DropTable("dbo.Products");
    }
}
If you did it correctly it will look like the code above.
If you look, at what it does, it creates two new tables. A table named “dbo.Products” and one named “dbo.Stores”. Each of them has the attributes that we specified earlier. If you look closely, then you can see that Entity Framework found the primary key by itself.
.PrimaryKey(t => t.Id)
Entity Framework looks for a property named “Id” on the model and automatically assumes that it is the primary key of the table if nothing else is specified. Another way to do it is by using attributes in your class.
If you go back into your “Store” class you can add the [Key] attribute to your Id by using the
using System.ComponentModel.DataAnnotations;
namespace then you can add it above the property of your choice.
public class Store
{
    [Key]
    public int Id { get; set; }

    public string Address { get; set; }
    public ICollection<Product> Products { get; set; }
}
There is a lot of other attributes that you can work with, but in this case, I just showed the Key attribute. It is not needed here, so I will remove it for now. Now we can update the database. To update the database we run the following command in NuGet package manager: “update-database”
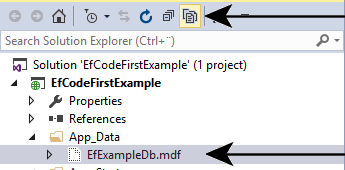
When that is done, you will now have a brand new database with the tables that you specified. It is located inside of the App_Data folder as a hidden file, so if you want to see it then click the “show hidden files” button.
If we take a look, at the database we can see that it contains three tables. “_MigrationHistory”, “Products” and “Stores”.
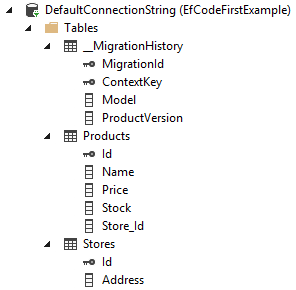
The reason that the Migration table is in the database is to keep track of our migrations, this comes handy in larger projects when more people are adding to the migrations this is because Entity Framework will know which migrations to execute on the database.
Seeding the Database
Seeding the database is very simple, the way that I have found to do it the best is by creating an empty migration and create SQL queries in that migration.
So go to NuGet package manager console, and create a new migration named: “SeedProductsAndStore”.
Inside of the migration class “Up” method write the following:
public partial class SeedProductsAndStore : DbMigration
{
    public override void Up()
    {
        Sql("INSERT INTO Stores (Address) VAlUES ('Skovbakken 50')");
        Sql("INSERT INTO Stores (Address) VAlUES ('Enghavevej 10')");

        Sql("INSERT INTO Products (Name, Price, Stock, Store_Id) VAlUES ('Milk', 1, 5000, 1)");
        Sql("INSERT INTO Products (Name, Price, Stock, Store_Id) VAlUES ('Cheese', 2.5, 1000, 2)");
        Sql("INSERT INTO Products (Name, Price, Stock, Store_Id) VAlUES ('Playstation 4', 1000, 100, 1)");
        Sql("INSERT INTO Products (Name, Price, Stock, Store_Id) VAlUES ('Baseball', 0.5, 8000, 2)");
    }

    public override void Down()
    {
    }
}
By using the “Sql” method in “Up” method we can write SQL queries directly to the database on a migration. So when the code is ready, go back to the NuGet console and update-database.
If you did it correctly you will now have a database with the newly queried data.

Note that seeding the database should only be with values that are either needed for testing, or for a specific purpose. A good example of using seeding is to seed a database with administrative roles.
Data Annotation
Data annotations can be used by Entity Framework, to manage how the tables in the database should be created. As I showed earlier in this post, we used the [Key] attribute to say that the Id property was the primary key for the table.
Here is an example of two other very commonly used data annotation attributes.
- [Required]
- Used to say that the column is not a nullable type
- All not nullable types like int and double will be set to be required by default. To deal with that problem make the types nullable by adding ? to the end of the type declaration as following: int? variable;
- [MaxLength(50)]
- By using this attribute you can specify the max length that the column can contain, if nothing is specified on your string data types then it will me MAX by default.
So let’s try to use them, so go to the Product class and put the [Required] attribute over the Name property and the [MaxLength()] property over it and set it to 50.
public class Product
{
        public int Id { get; set; }

        [Required]
        [MaxLength(50)]
        public string Name { get; set; }
        public float Price { get; set; }
        public int Stock { get; set; }
}
The Product database table looks as following right now:
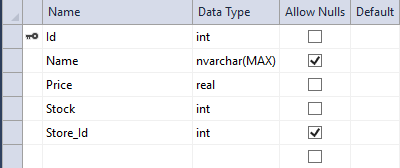
As you can see the Name is nullable and is not required. So go into your Nuget console and make add migration with a meaningful name and update the database.
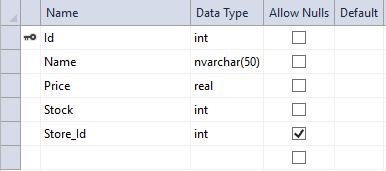
Your table should now look like the one below. With the name being required and having a max length of 50.
Using the Database Context
Now that we have a working database, with data and a database context class we can start using it.
So we just create a new ApplicationDbContext object and use the object to run queries from, just like you would in a database first approach.
var context = new ApplicationDbContext();
var products = context.Products.ToList();
var stores = context.Stores.ToList();
So why use code first?
So all this seemed like a long process just to make a database with two tables in it. Why not just use Entity Frameworks Database or Model first approach? The problem is that they make a big .edmx model file with a lot of auto-generated code that we should not tamper with. The only way to make extra functionality or add properties that should not be in the database is by extending the model classes that are inside of the .edmx file.
The database first approach auto-generates the properties for you, this is sometimes a problem when it comes to naming convention, by using code-first we have more control over our classes and properties. Code-first also comes with database version control, this is done by using the migrations we have made. All the migrations are stored in the database in a table.
It is much easier to manage a code-first because the schema of the database is based on our models, so when we change our models in the code we automatically change our database on a migration, so the database is always up to date with the code.