Using caching is an essential way to improve performance in your application. With ASP.NET Core you have to download and setup the associated middlewares. In this blog post, I will introduce you to response caching and show how to implement it in a web application.
What is response caching
Response caching is a way to add cache headers to an HTTP response. The cache headers tell the browser how long it should cache each response and thereby reduce the load on the server and provide faster response time to the users.
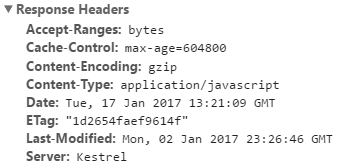
Response caching works because all browsers implement an HTTP cache. The HTTP cache is the place where the browser cache HTTP responses that contain the “Cache-Control” attribute. The attribute contains a value called “max-age” which specifies how long the browser should cache the data for. The value could look like this “max-age=120” where the value is in seconds. You can use response caching to cache most things that are returned by the HTTP protocol, this includes images, scripts, and HTML pages.
_An example of a response header with cache control. _

Most of the time you will also see response headers with the e-tag attribute. The e-tag attribute is a token based value that identifies if the content on the server has changed or not. If the e-tag value is still the same after the expiration of cache-control, the browser will return the same cached version of the content to the user. In most cases, you would want to use the e-tag attribute.
_An example of a response header using the e-tag attribute. _
Implement response caching in ASP.NET Core
The implementation uses en empty ASP.NET Core version 1.1. The response caching implementation is inside the ASP.NET MVC library so go to your project.json file and add the following dependency.
"Microsoft.AspNetCore.Mvc": "1.1.0"
When the package has been installed go to the “Startup.cs” file and go to the “Configure” method add the use of static files and use of MVC to the bottom of the method.
app.UseStaticFiles();

app.UseMvc(routes => {
    routes.MapRoute(
    name: "default", template: "{controller=Home}/{action=Index}/{id?}");
});
When that is done when can add the response cache configurations. Inside the same file go to the “ConfigureServices” method and add the following code.
services.AddMvc(options = >{
    options.CacheProfiles.Add("Default", new CacheProfile() {
        Duration = 120
    });
    options.CacheProfiles.Add("Never", new CacheProfile() {
        Location = ResponseCacheLocation.None,
        NoStore = true
    });
});
The configuration adds two cache profiles, one named “Default” and one named “Never”. The profile names will be used when we specify the response caching on the controllers. The duration attribute specifies how long we want our max-age value you to be, and as stated before, the value is defined in seconds. This profile will be used for response caching.
The other profile is used when we don’t want to cache. The “Location” property specifies that we don’t want the browser to store the data, and the “NoStore” attribute tells that we don’t want the values to be stored.
Next step is to create a controller to we can test our profiles. So I have created a basic controller with two action methods all using the “ResponseCache” attribute. The response cache attribute comes from the “Microsoft.AspNetCore.Mvc” namespace.
Inside the attribute, we can either specify the values ourselves or make use of our profiles. In this case, I added a response cache attribute to the whole Controller, if no attribute is defined on a method inside the controller it will set a max-age value of 60 to the HTTP response that the method sends back to the user. The two methods make use of the “Default” profile and the “Never” profile, where both will override the attribute of the controller.
using Microsoft.AspNetCore.Mvc;

namespace ResponseCacheSample.Controllers
{
    [ResponseCache(Duration = 60)]
    public class HomeController : Controller
    {
        [ResponseCache(CacheProfileName = "Default")]
        public IActionResult Index()
        {
            return View();
        }

        [ResponseCache(CacheProfileName = "Never")]
        public IActionResult Contact()
        {
            return View();
        }
    }
}
In the image below I have tested both methods and this is the headers that will be received using the two profiles.
Profile “Default”

Profile “Never”
