The concept of an inversion of control container(IOC container) is widely used in software development today. If you’re new to IOC containers it can be an annoyance to get it setup correctly. The result being long hours spent with a lot of trial and error. In this blog post, I will show you have to integrate an IOC container with Umbraco CMS from start to end. Hopefully, giving you a great fundament to work on.
The blog post is structured the following way.
- Installing Castle Windsor
- Overwriting Umbraco Global.asax
- Folder Structure
- Installers
- Extending IWindsorContainer
- Extending FromDescriptor
- Umbraco Installer
- Controller Installer
- Site Installer
- Service installer
- Controller factory
- Setting up IHttpControllerActivator
- Bootstrap Castle Windsor
Installing Castle Windsor
To get started you should have an ASP.NET MVC project with Umbraco installed as a package. Furthermore, you should have run the Umbraco setup and have a Umbraco database with the required Umbraco specific tables that are generated doing the Umbraco setup. The guide will be using Umbraco version 7.6.3.
Installing Castle Windsor is easy. It is installed utilizing NuGet package manager either by using the GUI or by using the NuGet CLI. The package can be installed by executing the following command using the CLI.
Install-package Castle.Windsor
Overwriting Umbraco Global.asax
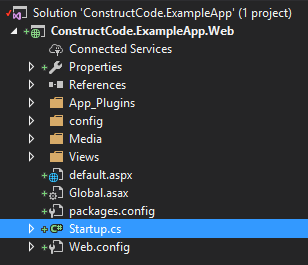
Create a new file in the root folder of your project. You can name it anything you want. In the example, it will be named “Startup”. This file is going to contain the Castle Windsor code that will be executed on startup.

First thing is to inherit the class “UmbracoApplication”. UmbracoApplication is the default Umbraco “Global.asax” class and is, therefore, the first thing to be executed on application start. By inheriting the class we now have the power to override the default implementations and perform our own startup logic.
// Startup.cs

using Umbraco.Web;

namespace ConstructCode.ExampleApp.Web
{
    public class Startup : UmbracoApplication
    {

    }
}
To get our IOC container up and running we need to override two methods “OnApplicationStarted” and “OnApplicationEnd:. To make sure everything Umbraco needs to do on startup, we will keep the call to the base implementation.
using System;
using Umbraco.Web;

namespace ConstructCode.ExampleApp.Web
{
    public class Startup : UmbracoApplication
    {
        protected override void OnApplicationStarted(object sender, EventArgs e)
        {
            base.OnApplicationStarted(sender, e);
        }

        protected override void OnApplicationEnd(object sender, EventArgs e)
        {
            base.OnApplicationEnd(sender, e);
        }
    }
}
Right now the code in our startup file is not being executed. The reason is that we haven’t told our application to use the new “Startup” class that we created. To do that, go to the “Global.asax” and change the value of the attribute named “Inherit” to point to the correct namespace with the file inside.
<%@ Application Inherits="ConstructCode.ExampleApp.Web.Startup" Language="C#" %>
Folder Structure
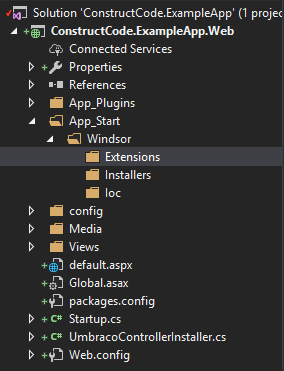
To have a consistent structure for our application we will be using the following folder structure for structuring our Castle Windsor configuration classes.

- The “Extensions” folder will hold all the classes on Windsor that we extend.
- The “Installers” folder we consist of all our installers, meaning all the classes that inherit from “IWindsorInstaller”.
- The “Ioc” folder we consist of all our inversion of control factory logic.
Installers
To register our components we need to make use of installers. An installer in Castle Windsor is simply a class that inherits the “IWindsorInstaller” interface. By inheriting the interface the “Install” method implementation is required. The reason that we need to implement the “IWindsorInstaller” interface is that it is used to identify all installers that Castle Windsor should execute on startup.
To scan our assembly for the classes that implement the “IWindsorInstaller” interface we need to create a container. The container is of type “IWindsorContainer” and is located in the “Castle.Windsor” namespace. Create the “IWindsorContainer” as a static member of the “Startup” class.
Next, create a private static method named “BootstrapContainer”. Inside of the “BootstrapContainer” method, we instantiate the local member of type “IWindsorContainer”. After the initialization of the container, we call the “Install” method on the container and pass the result from the static method “This” on the “FromAssembly” class.
The “This” method scans the current assembly and returns a reference to all the classes that inherit from “IWindsorInstaller”. The result is that the container can instantiate them and call the “Install” method on each of the installers. Remember to also call the “Dispose” method on the container inside of the “OnApplicationEnd” to make sure that the container gets disposed correctly when the application is closed.
using Castle.Windsor;
using Castle.Windsor.Installer;
using System;
using Umbraco.Web;

namespace ConstructCode.ExampleApp.Web
{
    public class Startup : UmbracoApplication
    {
        private static IWindsorContainer _container;

        protected override void OnApplicationStarted(object sender, EventArgs e)
        {
            base.OnApplicationStarted(sender, e);
            BootstrapContainer();
        }

        private static void BootstrapContainer()
        {
            _container = new WindsorContainer();
            _container.Install(FromAssembly.This());
        }

        protected override void OnApplicationEnd(object sender, EventArgs e)
        {
            base.OnApplicationEnd(sender, e);
            _container.Dispose();
        }
    }
}
Extending IWindsorContainer
Before we start creating our installers we will extend the IWindsorContainer interface with some custom implementations. Go to the “App_Start/Windsor/Extensions” folder. Add a new class named “WindorContainerExtension”. The extension methods are not required, but they will help us create a cleaner interface to work with when registering types to our container.
The class will consist of three methods.
A generic method named “RegisterApiControllerFromAssemblyContaining". All it does is to reduce the amount of typing that we have to do when registering api controllers from our current assembly that contains a specific type.
A method named “RegisterApiControllerFromThisAssembly". It reduces the amount of typing needed when registering all classes from the current assembly.
A private method named “RegisterApiControllerFrom” that registers all the types that inherit from “IHttpController” that is registered in the assembly passed into the method. Both “RegisterApiControllerFromAssemblyContaining” and “RegisterApiControllerFrom” depends on this method. The types are registered as Transient. If you’re new to container lifetimes, you can read more about it here.
using Castle.MicroKernel.Registration;
using Castle.Windsor;
using System.Web.Http.Controllers;

namespace ConstructCode.ExampleApp.Web
{
    public static class WindsorContainerExtension
    {
        public static IWindsorContainer RegisterApiControllerFromAssemblyContaining<T>(this IWindsorContainer container)
        {
            return container.RegisterApiControllerFrom(Classes.FromAssemblyContaining<T>());
        }

        public static IWindsorContainer RegisterApiControllerFromThisAssembly(this IWindsorContainer container)
        {
            return container.RegisterApiControllerFrom(Classes.FromThisAssembly());
        }

        private static IWindsorContainer RegisterApiControllerFrom(this IWindsorContainer container, FromDescriptor from)
        {
            return container.Register(from.BasedOn<IHttpController>().LifestyleTransient());
        }
    }
}
Extending FromDescriptor
FromDescriptor is a type used for referencing the types we want to register in our container. By creating the following extension method we can find all the types with an interface following the standard interface naming convention of capital “I” followed by the name. This will help us when we need to register types for our container.
using Castle.MicroKernel.Registration;

namespace ConstructCode.ExampleApp.Web
{
    public static class FromDescriptorExtension
    {
        public static BasedOnDescriptor WithDefaultInterface(this FromDescriptor fromDescriptor)
        {
            return fromDescriptor.Where(t => t.GetInterface($"I{t.Name}") != null);
        }
    }
}
Umbraco installer
Now that we have our extensions setup for our installers we can start creating our first installer. The first we will be creating is our Umbraco controller installer. Go to the folder “App_Start/Windsor/Installers” and create a new class named “UmbracoControllerInstaller” and inherit from “IWindsorInstaller”.
Next step is to implement the “Install” method. The “Install” method gives us an “IWindsorContainer” and an “IConfigurationStore” in this method we will only be using the container.
The implementation of the “UmbracoControllerInstaller” is very simple. We use our extension method “RegisterApiControllerFromAssemblyContaining” on the container and pass “UmbracoApplication” as the generic type to the method. The method then scans the assembly and registers all types of “IHttpController” and adds them to the container. The same things are done with the type of “ModelsBuilderApplication”.
using Castle.MicroKernel.Registration;
using Castle.MicroKernel.SubSystems.Configuration;
using Castle.Windsor;
using Umbraco.Web;
using Umbraco.ModelsBuilder.Umbraco;

namespace ConstructCode.ExampleApp.Web
{
    public class UmbracoControllerInstaller : IWindsorInstaller
    {
        public void Install(IWindsorContainer container, IConfigurationStore store)
        {
            container
                .RegisterApiControllerFromAssemblyContaining<UmbracoApplication>()
                .RegisterApiControllerFromAssemblyContaining<ModelsBuilderApplication>();
        }
    }
}
If you ever add new packages to Umbraco you might need to register them there. If something breaks, the first step is to go into the “UmbracoControllerInstaller” and add the type and see if that helps.
Controller installer
Next, we need to create our Controller installer. The controller installer is needed to make sure that when a controller is created that its dependencies get resolved.
In the “Install” method below, we register all classes from the current assembly that inherits from the “IController” interface and gives them the lifetime of “transient”. The last method call, calls the extension method we created earlier. The extension method registers all the classes that inherit from “IHttpController” in the current assembly.
using Castle.MicroKernel.Registration;
using Castle.MicroKernel.SubSystems.Configuration;
using Castle.Windsor;
using System.Web.Mvc;

namespace ConstructCode.ExampleApp.Web
{
    public class ControllerInstaller : IWindsorInstaller
    {
        public void Install(IWindsorContainer container, IConfigurationStore store)
        {
            container.Register(Classes.FromThisAssembly()
                .BasedOn<IController>()
                .LifestyleTransient());

            container.RegisterApiControllerFromThisAssembly();
        }
    }
}
Site Installer
The site installer is used for registering all types in our application that has an interface following the syntax that we describe in our “FromDecriptorExtension” method. The Site installer is important because it registers all the types that are not IHttpController and IController.
using Castle.MicroKernel.Registration;
using Castle.MicroKernel.SubSystems.Configuration;
using Castle.Windsor;

namespace ConstructCode.ExampleApp.Web.App_Start.Windsor.Installers
{
    public class SiteInstaller : IWindsorInstaller
    {
        public void Install(IWindsorContainer container, IConfigurationStore store)
        {
            container.Register(
                Classes.FromThisAssembly()
                    .WithDefaultInterface()
                    .WithServiceDefaultInterfaces()
                    .LifestyleTransient());
        }
    }
}
Service installer
This installer is required if you ever need to register types from another assembly. If you’re the type of developer, that split your application up into libraries, this is required for adding types from other assemblies to your container. Remember to change the value of the “_assembly” variable to the namespace where you want to register the implementations.
using Castle.MicroKernel.Registration;
using Castle.MicroKernel.SubSystems.Configuration;
using Castle.Windsor;

namespace ConstructCode.ExampleApp.Web
{
    public class ServiceInstaller : IWindsorInstaller
    {
        private const string _assembly = "ConstructCode.ExampleApp.Service";

        public void Install(IWindsorContainer container, IConfigurationStore store)
        {
            container.Register(Classes.FromAssemblyNamed(_assembly)
                    .WithDefaultInterface()
                    .WithServiceDefaultInterfaces()
                    .LifestyleSingleton());
        }
    }
}
Controller factory
For Castle Windsor to instantiate our controllers we need to add them to our Windsor kernel. The important part of the code below is in the “GetControllerInstance” method. In that method, we get the kernel to resolve the Controller on each request.
using Castle.MicroKernel;
using System;
using System.Web;
using System.Web.Mvc;
using System.Web.Routing;

namespace ConstructCode.ExampleApp.Web
{
    public class ControllerFactory : DefaultControllerFactory
    {
        private readonly IKernel kernel;

        public ControllerFactory(IKernel kernel)
        {
            this.kernel = kernel;
        }

        public override void ReleaseController(IController controller)
        {
            kernel.ReleaseComponent(controller);
        }

        protected override IController GetControllerInstance(RequestContext requestContext, Type controllerType)
        {
            if (controllerType == null)
            {
                throw new HttpException(404, string.Format("The controller for path '{0}' could not be found.", requestContext.HttpContext.Request.Path));
            }

            return IsKnownComponent(controllerType)
                ? (IController)kernel.Resolve(controllerType)
                : base.GetControllerInstance(requestContext, controllerType);
        }

        private bool IsKnownComponent(Type controllerType)
        {
            return kernel.HasComponent(controllerType);
        }
    }
}
Setting up IHttpControllerActivator
The “IHttpControllerActivator” is needed for resolving all the HTTP requests that hit a controller of type “IHttpController” and correctly resolve the needed dependencies.
using Castle.Windsor;
using System;
using System.Net.Http;
using System.Web;
using System.Web.Http.Controllers;
using System.Web.Http.Dispatcher;

namespace ConstructCode.ExampleApp.Web
{
    public class WindsorHttpControllerFactory : IHttpControllerActivator
    {
        private readonly IWindsorContainer _container;

        public WindsorHttpControllerFactory(IWindsorContainer container)
        {
            _container = container;
        }

        public IHttpController Create(HttpRequestMessage request, HttpControllerDescriptor controllerDescriptor, Type controllerType)
        {
            if (IsKnownComponent(controllerType) == false)
            {
                throw new HttpException(404, $"The controller for path '{request.RequestUri.LocalPath}' could not be found.");
            }

            var controller = (IHttpController)_container.Resolve(controllerType);

            request.RegisterForDispose(new Release(() => _container.Release(controller)));

            return controller;
        }

        private bool IsKnownComponent(Type controllerType)
        {
            return _container.Kernel.HasComponent(controllerType);
        }

        private class Release : IDisposable
        {
            private readonly Action release;

            public Release(Action release) { this.release = release; }

            public void Dispose()
            {
                release();
            }
        }
    }
}
Bootstrap Windsor
The last thing we need to do to make everything work is to remove the current implementation of IHttpControllerActivator and the current implementation of “ControllerFactory” so Castle Windsor, can do the creation of the “IHttpControllers” and “IController”.
private static void BootstrapContainer()
{
    _container = new WindsorContainer();
    _container.Install(FromAssembly.This());

    GlobalConfiguration.Configuration.Services.Replace(typeof(IHttpControllerActivator), new WindsorHttpControllerFactory(_container));
    ControllerBuilder.Current.SetControllerFactory(new ControllerFactory(_container.Kernel));
}
When that is done, everything should work, and you should now have a fully functional IOC container implementation.