With the release of ASP.NET Core 1.0, Microsoft encourages developers to use task runners like Gulp and Grunt. In this blog, I will go over the basic to get started setting up Gulp for an ASP.NET Core application.
Quick introduction to Gulp
Gulp is a task runner tool that is built on Node.js with the use of the JavaScript language. It is used for automating tasks such as minification, copying of JavaScript/CSS files, static images and so on. Gulp is capable of watching your files and do the assigned tasks on file changes. There has been created a lot of open source extensions to Gulp and Gulp can, therefore, do a lot of different tasks from reloading the browser on file changes to compile SASS/LESS files to CSS. The usage of Gulp as a task runner increases the productivity in software development.
In this blog post, I will show how to create a Gulp file that combines a lot of javascript and CSS files into two single files a CSS file and a JavaScript file minifies them and moves them to another folder.
Setting up the project
To start using Gulp you should download Node from https://nodejs.org/ we will use the Node package manager(npm) to install gulp for our solution which comes with the Node installment.
When you have installed Node, create a new solution. In this example, I will use an empty ASP.NET Core 1.0 web application created with Yeoman http://yeoman.io/ using the command below.
yo aspnet
If you don’t have yeoman, you can install it from node package manager typing the command below.
npm-install -g yo
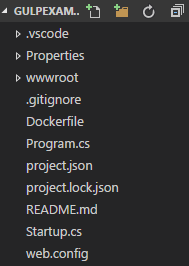
If you don’t want to use yeoman or npm, you can just create an empty asp.net core application from Visual studio, your application structure might be a little different from mine, but it should not be a problem.
If you want to compare your folder structure to mine, the structure is shown in the image below.
Installing Gulp
Now that the application is setup and ready, we should install Gulp with npm. You can install Gulp in two ways, either by manually adding a package.json file and add the following code into the file:
{
    "name": "gulpexample",
    "version": "1.0.0",
    "description": "Example of usages of Gulp",
    "main": "index.js",
    "dependencies": {},
    "devDependencies": {
        "gulp": "^3.9.1",
        "gulp-concat": "^2.6.0",
        "gulp-cssmin": "^0.1.7",
        "gulp-uglify": "^1.5.4"
     },
     "scripts": {
       "test": "echo \"Error: no test specified\" && exit 1"
     },
     "author": "Rune Andreas Nielsen",
     "license": "ISC"
 }
open a console window and navigate to the solution folder, write the following:
npm install
this command will install all the modules that are specified in the package.json file.
Another way to achieve the same thing (a better way in my opinion) is by opening a console window and navigate to the folder in which the application is. Write
npm init
Thereafter some questions about the application will be asked, type in the answers.
This will create a package.json file which is a file containing the Node dependencies for the application. When you’re done write (separate commands):
npm install gulp  –save-dev

npm install gulp-concat  –save-dev

npm install gulp-cssmin –save-dev

npm install gulp-uglify  –save-dev
This will install Gulp and three “extensions” as development dependencies, meaning that it is only for development purposes and not for deployment, the dependencies will be added to the package.json file. If you did it correctly you will now have a folder named node_modules and in that folder, containing all the files needed to run Gulp.
Setting up Gulp
To start out create a new file and name it ‘gulpfile.js’ when that is created we need to make a reference to gulp, to do that, write the following code.
var gulp = require("gulp");
var uglify = require("gulp-uglify");
var concat = require("gulp-concat");
var cssmin = require("gulp-cssmin");
This will allow us to use the functionality of Gulp and the extra modules by using the reference variables.
Next thing is to make a reference to the folders that we want to work with, this can be done in multiple ways, but I like the following the best.
var paths = {
    webroot: "./wwwroot/",
    css: "./Client/Styles/*.css",
    js: "./Client/Scripts/*.js",
    concatCssDest: "./wwwroot/styles/site.min.css",
    concatJsDest: "./wwwroot/scripts/site.min.js"
}
The reason for this is that we will only have a single place to change the references in case of our Gulp file being very big in the future or we might want to change the folder structure of our application.
Another way to achieve the same thing is by making the path strings directly in the gulp tasks, but this will make the file harder to maintain in case of a lot of file paths being the same, so I try to always keep the file paths in a single place.
Remember to create the “Client” folder and place a “Scripts” and a “Style” folder inside, you can choose to either do that or create your own file structure for the client-side folders, just remember to change the paths to your specific choice of solution structure.
Place some code inside of the files for testing later, I just inserted an immediately-invoked function expression(IFFE) that alerts “Hello World One” and another IFFE alerting “Hello World Two” you can do the same if you want to.
Creating your first task
Now that Gulp is set up and we have created paths and reference variables we can create our first task. A task is approximately the same as a method/function, but it will be called from the command prompt using the gulp command followed by a task name.
An example of calling a gulp task from a command line is shown below.
gulp clean
So the first task we will create is one that minifies a javascript file and inserts it into our wwwroot folder.
Creating a task is very simple. The code is shown below and I will be explained in detail.
gulp.task("minify:js", function() {
    gulp.src(paths.js)
    .pipe(concat(paths.concatJsDest))
    .pipe(uglify())
    .pipe(gulp.dest("."))
});
The first part of the code we use the ‘gulp’ reference to call a function named task, the task function takes two parameters one of them being the name of the task and the other being a function. In the example, I am using an anonymous function, but you can pass in a function reference if you want to.
Next, we call the ‘src’ function on the gulp reference and pass in the ‘paths.js’ reference we defined on the paths variable. The function defines the path where the pipe should start. A pipe in Gulp can be visualized as an assembly line in which a product is being passed on and processed and distributed to the next assembly line and are manipulated in different ways.
So in our example, we first use the concat module to assemble our javascript files into a single Javascript file and copy it to the “wwwroot/scripts/” folder and name it “site.min.js”, then we uglify it, and the uglify function minifies the javascript into a single line to remove white spaces and makes the variable names single letter and remove all comments. Last we use the ‘dest’ function on the gulp reference and specify that it should use the current path by passing “.” into the function parameter.
So now that we have created a Gulp task we need to call it. To do that you can either call the task directly or make another task that can be modified to call multiple tasks at the same time.
gulp.task("minify", ["minify:js"]);
Insert the above code into the gulp file and open a command prompt and type the following command:
gulp minify
This will call the task and the output should look like this.

So now if we check the JavaScript files that we created we will now have a single file inside of the wwwroot/scripts folder named site.min.js with the following minified code inside.
!function(){alert("Hello World One!")}(),function(){alert("Hello World Two!")}();
The same thing can be done with CSS minification as shown in the code below (Contains the whole Gulp file).
var gulp = require("gulp");
var uglify = require("gulp-uglify");
var concat = require("gulp-concat");
var cssmin = require("gulp-cssmin");

var paths = {
    webroot: "./wwwroot/",
    css: "./Client/Styles/*.css",
    js: "./Client/Scripts/*.js",
    concatCssDest: "./wwwroot/styles/site.min.css",
    concatJsDest: "./wwwroot/scripts/site.min.js"
}

gulp.task("minify:js", function(){
    gulp.src(paths.js)
    .pipe(concat(paths.concatJsDest))
    .pipe(uglify())
    .pipe(gulp.dest("."))
});

gulp.task("minify:css", function(){
    gulp.src(paths.css)
    .pipe(concat(paths.concatCssDest))
    .pipe(cssmin())
    .pipe(gulp.dest("."));
});

gulp.task("minify", ["minify:js", "minify:css"]);
So in the modified code, we have added a new task and changed it to use ‘cssmin’ function and added the “minify:css” task to the “minify” task. So now if run the gulp minify command we will combine both the CSS and JavaScript files into two files and move them to the folders we specified in the path variables.
Watching files with Gulp
So now that we have created two tasks to combine, minify and move files you will notice very fast that it is very time-consuming and annoying to call the task everytime yourself when a file changes. To avoid having to call it ourselves we can make use of the ‘watch’ function in Gulp.
A watch in Gulp is a function that watches for file changes and if a file changes a specified task will be run.
So we will create two watches, one for the CSS files and one for the JavaScript files. So first, we remove the “minify” task and replace it with the following code:
gulp.task("start", function(){
    gulp.watch(paths.css, ['minify:css']);
    gulp.watch(paths.js, ['minify:js']);
});
This task has two watch functions where we pass in the path to the files to watch for changes and specifies the task that should be run when a file change.
Open a command prompt and type
gulp start
This command will run the task and the watch function will now run in the background. If you try to change one of the JavaScript files the task will be run and the minified file will automatically be updated.
The entire file is shown below.
var gulp = require("gulp");
var uglify = require("gulp-uglify");
var concat = require("gulp-concat");
var cssmin = require("gulp-cssmin");

var paths = {
    webroot: "./wwwroot/",
    css: "./Client/Styles/*.css",
    js: "./Client/Scripts/*.js",
    concatCssDest: "./wwwroot/styles/site.min.css",
    concatJsDest: "./wwwroot/scripts/site.min.js"
}

gulp.task("minify:js", function(){
    gulp.src(paths.js)
    .pipe(concat(paths.concatJsDest))
    .pipe(uglify())
    .pipe(gulp.dest("."))
});

gulp.task("minify:css", function(){
    gulp.src(paths.css)
    .pipe(concat(paths.concatCssDest))
    .pipe(cssmin())
    .pipe(gulp.dest("."));
});

gulp.task("start", function(){
    gulp.watch(paths.css, ['minify:css']);
    gulp.watch(paths.js, ['minify:js']);
});