JavaScript heavy websites are becoming more and more common. To reduce the number of HTTP requests and solve the problems with which order scripts should be loaded, tools like Webpack has emerged. In this post, I will show you how to setup Webpack 2 and use it to bundle JavaScript files. To follow the guide you should have node package manager installed and have a basic understanding of modules in JavaScript.
Setting up project
I have created a basic project with the following file structure and code inside of each file.
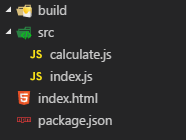
calculate.js
const calculate = (a, b) => a + b;

module.exports = calculate;
index.js
const calculate = require('./calculate');

let value = calculate(10, 10);
console.log(value);
index.html
<head></head>
<body>

</body>
package.json
{
    "name": "webpack-constructcode",
    "version": "1.0.0",
    "description": "",
    "main": "index.js",
    "scripts": {
    },
    "author": "",
    "license": "ISC"
}
Webpack 2
To install Webpack 2 run the following command
npm install --save-dev webpack@2.2.0-rc.0
Next, create a file named “webpack.config.js” in the root folder and add the following code.
const path = require('path');

const config = {
    entry: './src/index.js',
    output: {
        path: path.resolve(__dirname, 'build'),
        filename: 'bundle.js'
    }
}

module.exports = config;
The important part of the code is the config object. Inside of the object, we specify an entry. The entry is the first point where Webpack will run and check all exports and imports and build the dependency tree from it. In the example were using here there is only one dependency from index.js to calculate.js. After the entry, an output object is created. The output contains a path which resolves the current directory and says that the output should be created in the “build” folder (If you don’t want to use the path.resolve method you can also specify the absolute path yourself). Next, comes the filename which will be the output file name of the bundled file, a standard convention is to name it “bundle.js”.
Running Webpack
To run Webpack there are two ways, the first is to install Webpack globally on your machine. I personally don’t like this approach since you will most likely be using Webpack on a lot of different projects with different versions, and therefore would have to configure the global Webpack everytime you switch between projects. The path I would take would be to setup a script inside of the “package.json” file. So the file now looks like the following. Containing a “build” script running the “webpack” command.
{
    "name": "webpack-constructcode",
    "version": "1.0.0",
    "description": "",
    "main": "index.js",
    "scripts": {
    "build": "webpack"
    },
    "author": "",
    "license": "ISC",
    "devDependencies": {
    "webpack": "^2.2.0-rc.0"
    }
}
So now to run the build command just type this in your console.
npm run build
if everything went well you will see the following output and have a file named “bundle.js” inside of your “build” folder.
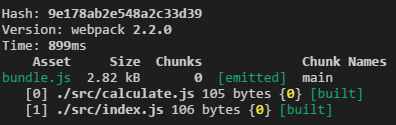
Next just add the script to your HTML page and load it inside of your browser and you should see the following output inside the console window.
