In this post, I will introduce how to use Webpack 2 to work with Sass files using loaders to bundle, minify, transpile and automatically add vendors specific CSS to the final bundle. If you’re new to webpack you should read this post link which contains an introduction to webpack.
To get started you should have a project with the following files.
package.json
{
    "name": "webpack-introduction",
    "version": "1.0.0",
    "description": "",
    "main": "index.js",
    "scripts": {
    "test": "echo \"Error: no test specified\" && exit 1"
    },
    "author": "",
    "license": "ISC",
    "devDependencies": {
    "webpack": "2.2.1"
    }
}
webpack.config.js
const path = require('path');

const config = {
    entry: './src/index.js',
    output: {
        path: path.resolve(__dirname, 'build'),
        filename: 'bundle.js'
    },
    module: {
        rules: [{

        }]
    }
}

module.exports = config;
src/index.js
import './styles/site.scss';
build/index.html
<head></head>
<body>
    <script src="bundle.js"></script>
</body>
src/styles/site.scss
body{
    background-color: green;

    p {
        color: red;
        font-size: 40px;
    }
}
In the end, your folder structure should look like this:

Installing the packages
To transpile our Sass files the following packages are required
- Node-Sass
- Style-loader
- Sass-loader
- Css-loader
To install the packages open your CLI of choice and type the following:
npm install --save-dev node-sass style-loader sass-loader css-loader
Using Webpack
When all the packages have been installed. Go to the package.json file and add the following script to the “scripts” section. The start command will be used to tell webpack to run and bundle our files. The reason we do this and not install webpack globally on the machine is that we can have a specific version for each of our projects and won’t have to change the version of webpack every time we which projects on our machine.
"start": "webpack"
Before we can use our new script we need to configure Webpack to know how to handle our files. Webpack uses loaders to process the files. I have written a small description of how loaders work in this blog post link.
Inside of the webpack.config.js add the following code to the rules section of the configuration.
test: /\.scss$/,
loaders: ['style-loader', 'css-loader', 'sass-loader']
So the whole file looks like this.
const path = require('path');

const config = {
    entry: './src/index.js',
    output: {
        path: path.resolve(__dirname, 'build'),
        filename: 'bundle.js'
    },
    module: {
        rules: [{
            test: /\.scss$/,
            loaders: ['style-loader', 'css-loader', 'sass-loader']
        }]
    }
}

module.exports = config;
The loaders will then run from right to left starting with the sass-loader. The important thing is that the order of which the loaders are inserted matters, so make sure your file has the same order as me.
Next step is just to run the “npm start” command in your CLI and Webpack will build the script and add it to the build folder. Next, open the HTML file in your browser and you should see this beauty of a website!

Move CSS to its own file
Now you might wonder where the CSS file is. If we take a look inside of the browser and look in the head tag we should see that webpack has injected the CSS into it.
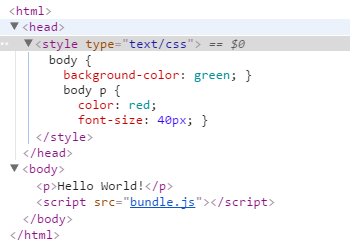
In most cases you don’t want this behavior, so to change that we will use another loader to take the CSS out of the bundle.js file and insert it into its own CSS file. To do that install extract-text-webpack-plugin, using the following command.
npm install --save-dev extract-text-webpack-plugin@2.0.0-beta.4
**NOTE: **At the point of writing this blog post, you need this specific version for Webpack 2, installing the latest version will result in a version only working for Webpack 1.
Using the plugin is quite easy, just require the extract-text-webpack-plugin and use it in the rules section of the page. The way the syntax in the loader section look is quite different now, but don’t worry it does the same, using the extract-text-webpack-plugin structure instead of the default webpack one. One thing to remember is that you now also need to add the plugin to the plugins section of the configuration.
const path = require('path');
const ExtractTextPlugin = require("extract-text-webpack-plugin");

const config = {
    entry: './src/index.js',
    output: {
        path: path.resolve(__dirname, 'build'),
        filename: 'bundle.js'
    },
    module: {
        rules: [{
            test: /\.scss$/,
            loader: ExtractTextPlugin.extract({
                fallbackLoader: "style-loader",
                loader: "css-loader!sass-loader",
            }),
        }]
    },
    plugins: [
        new ExtractTextPlugin("styles.css"),
    ]
}

module.exports = config;
Next step is just to add the styles to the head section of the HTML page.
<head>
    <link rel="stylesheet" href="styles.css">
</head>
<body>
    <p>Hello World!</p>
    <script src="bundle.js"></script>
</body>
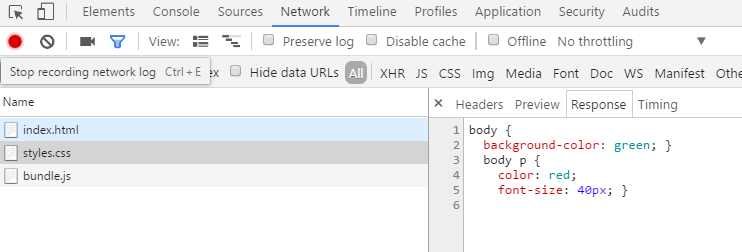
Run the npm start command and you should now have a styles.css file in the build folder. Opening the website in the browser and looking at the Network tab we should now see the styles.css being loaded from the file system.
Adding vendor specific CSS styles
Instead of adding the vendor specific CSS styles ourselves, we can make use of two powerful packages named postcss and autoprefixer. To install the packages run the following command.
npm install --save-dev autoprefixer postcss-loader
Next, we need to configure webpack to make use of the new packages. The changes are pretty simple, we use postcss-loader in the rules section and configure the postcss-loader in the plugins section, telling it to use autoprefixer, to add vendor specific CSS to our final bundle.
const path = require('path');
const ExtractTextPlugin = require("extract-text-webpack-plugin");
const autoprefixer = require('autoprefixer')
const webpack = require('webpack')

const config = {
    entry: './src/index.js',
    output: {
        path: path.resolve(__dirname, 'build'),
        filename: 'bundle.js'
    },
    module: {
        rules: [{
            test: /\.scss$/,
            loader: ExtractTextPlugin.extract({
                fallbackLoader: "style-loader",
                loader: "css-loader!sass-loader!postcss-loader",
            }),
        }]
    },
    plugins: [
        new ExtractTextPlugin("styles.css"),
        new webpack.LoaderOptionsPlugin({
            options: {
                postcss: [autoprefixer]
            }
        })
    ]
}

module.exports = config;
To check if it works we add a specific CSS property that other vendors use another name for. In this case, we add display: flex.
body {
    background-color: green;
    p {
        color: red;
        font-size: 40px;
        display: flex;
    }
}
Running npm start will result in a CSS file containing the following, with the vendor specific properties inserted automatically.
body {
    background-color: green; }
    body p {
    color: red;
    font-size: 40px;
    display: -webkit-box;
    display: -ms-flexbox;
    display: flex; }
Minifying our CSS
The last step in our Webpack 2 CSS journey is to minify our CSS file. To do that we will make use of a loader we have already installed, the css-loader. To minify our CSS bundle just go to the webpack.LoaderOptionsPlugin configuration part of the file and add the following line above the options object.
minimize: true,
So the final file looks like this.
const path = require('path');
const ExtractTextPlugin = require("extract-text-webpack-plugin");
const autoprefixer = require('autoprefixer')
const webpack = require('webpack')

const config = {
    entry: './src/index.js',
    output: {
        path: path.resolve(__dirname, 'build'),
        filename: 'bundle.js'
    },
    module: {
        rules: [{
            test: /\.scss$/,
            loader: ExtractTextPlugin.extract({
                fallbackLoader: "style-loader",
                loader: "css-loader!sass-loader!postcss-loader",
            }),
        }]
    },
    plugins: [
        new ExtractTextPlugin("styles.css"),
        new webpack.LoaderOptionsPlugin({
            minimize: true,
            options: {
                postcss: [autoprefixer]
            }
        })
    ]
}

module.exports = config;
Now run **npm start **and your CSS file is now minified yay!
body{background-color:green}body p{color:red;font-size:40px;display:-webkit-box;display:-ms-flexbox;display:flex}
You now have a setup to work with Sass files using Webpack 2.